
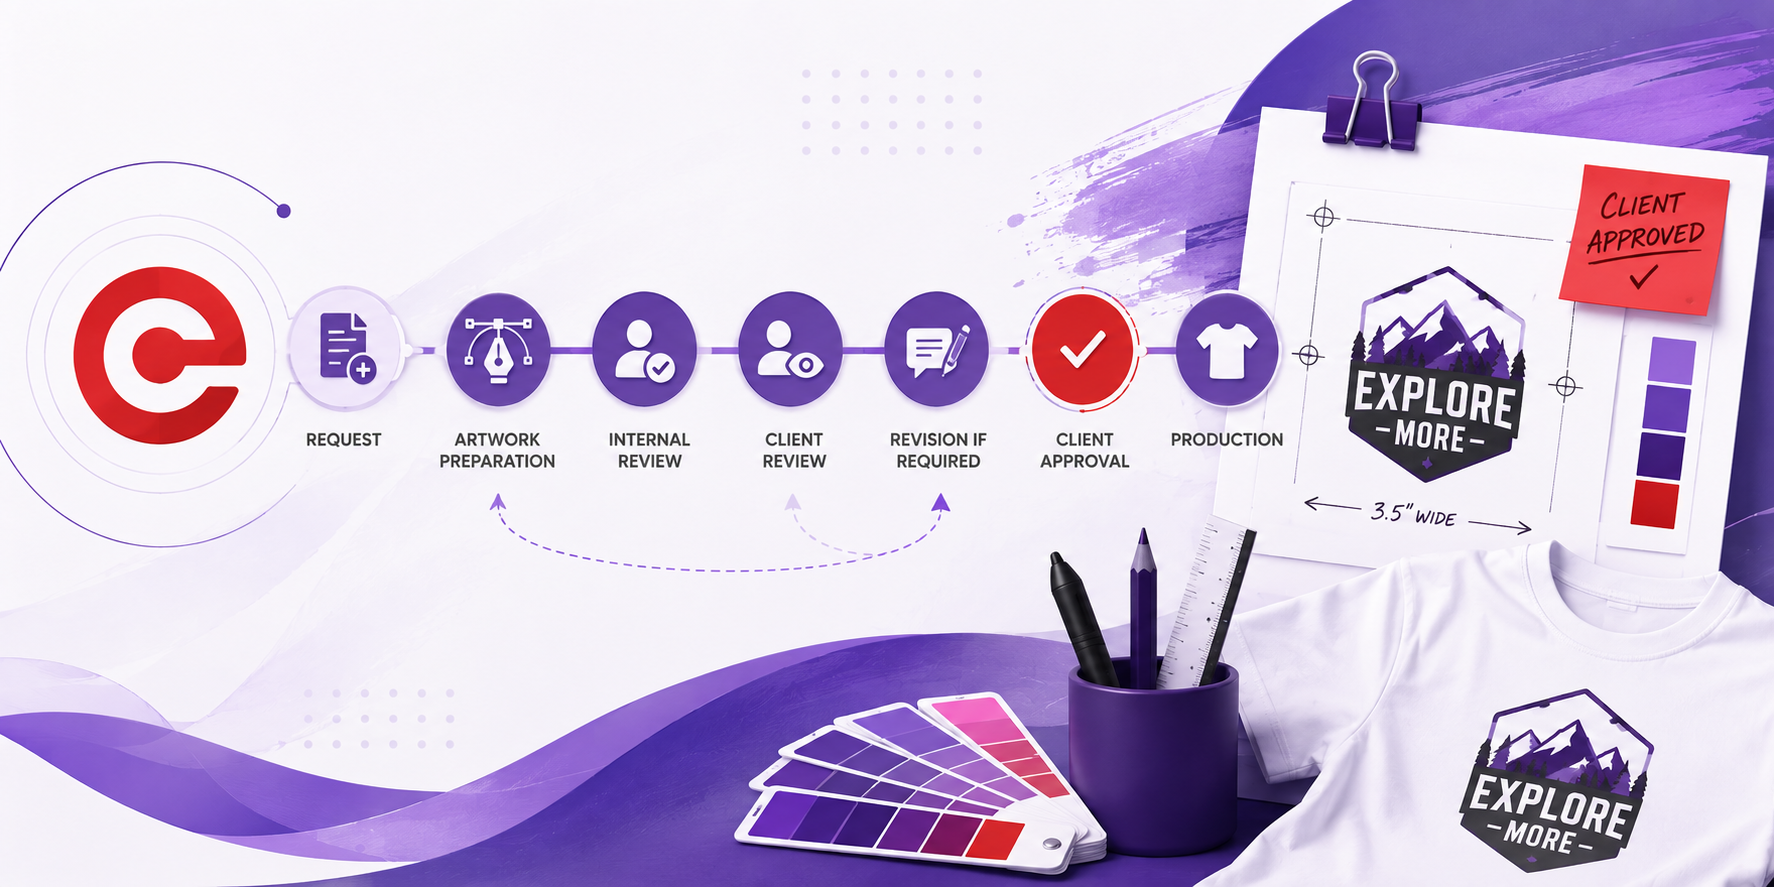
Artwork in Elite Core connects the selling process with the production process. The artwork workflow gives the salesperson, artwork team, client, decorator, purchasing team, and production team a shared record of what is being created, where it will appear, what colours and dimensions apply, whether changes have been requested, and whether the final design has been approved for production.
An artwork request should contain more than a logo file. It should clearly identify the product being decorated, the intended decoration method, the placement, the required dimensions, the intended colours, and any instructions that affect how the artwork should be prepared.
The artwork workflow generally moves through request, design, internal review, client review, revision when required, client approval, and production.
The Core Rule
Artwork should be requested only when there is enough confirmed information for the artwork team to create a meaningful client proof.
The salesperson should not expect the artwork team to determine basic order information that should already have been established during the Sales Order process. The product, decoration method, intended placement, available logo assets, expected colours, dimensions, and important client instructions should be known before the request is submitted whenever possible.
The artwork record should remain connected to the correct Sales Order product and decoration throughout the workflow. When the client approves the artwork, that approval should apply to the exact version that will be used for purchasing and production.
Understanding the Elite Core Artwork Workflow
The artwork workflow begins when a Sales Order product requires artwork preparation or client approval before production can proceed. The salesperson creates an artwork request and associates it with the applicable Sales Order product so the artwork team can see both the client assets and the production details that define what must be created.
The artwork team prepares the proof or production artwork from that request. Before the client sees it, the salesperson should perform an internal review to confirm that the proof matches the request and the current Sales Order. The client then reviews the current version and either approves it or requests changes.
When changes are required, the revision should remain tied to the original request rather than becoming a disconnected new job. Each revision should preserve enough history to show what changed, and final approval must clearly apply to the exact version intended for production.
Request → Artwork Preparation → Internal Review → Client Review → Revision if Required → Client Approval → Production
The purpose of this process is not simply to create a visually attractive proof. Its purpose is to establish a clear, approved production instruction that downstream teams can trust.
When Should You Request Artwork?
Artwork should normally be requested after the salesperson understands what the client is ordering and before production needs to begin. The product should already be identified, and the relevant decoration requirements should be reasonably settled. Avoid sending artwork requests for products that may still be replaced unless the request clearly explains that the artwork is exploratory.
Before requesting artwork, confirm the product, intended decoration method, placement, approximate dimensions, client logo or artwork source, required imprint colours, and any important brand requirements. When the product already exists on a Sales Order, associate the artwork request with the correct Sales Order product.
Artwork may sometimes begin before every purchasing detail is final. That is acceptable when the information that affects the visual design is complete enough to create a meaningful proof without predictable rework.
How to Request Artwork
Begin from the Sales Order or artwork area associated with the project and locate the available action for creating a new artwork request. Create the request against the correct project and Sales Order, then identify the specific product that will be decorated.
Enter the decoration method, placement, dimensions, imprint colours, logo requirements, and client-specific instructions. These details should explain the intended production result rather than merely describe the general idea. If a special brand rule, production limitation, or client preference affects how the design must be prepared, include it before the artwork team begins.
Attach the best available client source artwork. Original vector or high-resolution production files are preferable to screenshots, compressed email images, or files copied from a website when better artwork is available.
Before submitting the request, review it from the artwork team’s perspective. Someone who was not part of the sales conversation should be able to understand what needs to be created, which product it belongs to, where the decoration goes, and what requirements must be respected.
How to Select the Product for an Artwork Request
The artwork request should be connected to the exact Sales Order product the client intends to purchase. This is especially important when one Sales Order contains several products with different decoration methods, placements, or logo requirements.
Before selecting the product, verify the product name, SKU or other product identifier, colour, variation, and any other distinguishing information. A similar product can have a different decoration area, different production limitations, or a different approved colour treatment.
The same logo may also require different artwork preparation depending on the product and decoration method. For example, a left-chest embroidered logo on a jacket may need simplified detail, thread colour decisions, and embroidery-specific sizing, while the same logo screen printed on a T-shirt may use a different maximum width, different colour separations, and a different placement reference.
How to Enter Decoration Details for Artwork
The decoration method affects how the artwork team prepares the file and proof. Methods may include embroidery, screen printing, direct-to-film printing, laser engraving, pad printing, digital printing, heat transfer, or another available production method. Choose or describe the method that applies to the selected product and intended result.
Describe the decoration location in production-oriented language. A precise location helps the artwork and production teams interpret the request consistently. Dimensions should communicate the intended maximum width, height, or other relevant measurement when known. If the design must fit a manufacturer-defined decoration area, treat that limit as part of the request.
Imprint colours should be recorded accurately, including formal brand references when available. Any production limitation, special instruction, or client requirement that may affect the design should be communicated before artwork preparation begins.
How to Enter Decoration Locations
Decoration locations should be specific enough that both the artwork and production teams reach the same interpretation. Avoid vague descriptions such as “front” when a more precise description such as left chest, right chest, full front, full back, upper back, sleeve, cap front, bottle side, or award plate is available.
Manufacturer-defined decoration areas should be respected because the usable space can vary by product, size, material, and production method. Even when the request refers to an earlier order, the current artwork request should still record the intended location clearly rather than relying on memory or undocumented precedent.
How to Enter Imprint Colours
Brand and imprint colours should be communicated as accurately as possible. When the client has official brand standards, record the appropriate colour references whenever they are known.
Informal descriptions such as royal blue, navy, or bright red can provide useful context, but they should not replace formal colour references when exact matching matters. Different product colours may also require different logo versions, such as a white logo on a dark garment and a dark logo on a light garment.
If several imprint colours are required, describe them in context so the artwork team understands which colour applies to each part of the design and whether any alternate versions are required for different product colours.
How to Upload Client Logo Files
Attach the best available source artwork. Vector formats such as AI, EPS, SVG, or suitable PDF files are generally preferable where available because they can usually be scaled and prepared for production more reliably.
High-resolution raster files may be usable when vector artwork is unavailable, but avoid relying on screenshots, compressed email images, website thumbnails, or low-resolution JPEG files when better source files can be obtained.
Use descriptive filenames and identify which logo version should be used when multiple versions exist. If the client has a brand guide or visual reference that clarifies colours, spacing, logo use, or placement, attach that information as part of the request.
How to Add Artwork Instructions
Artwork instructions should be clear, production-oriented, and complete enough to remove avoidable assumptions. A strong instruction explains what artwork appears, where it appears, how large it should be, what colours should be used, and what client requirements need to be respected.
Instead of writing “Put logo on shirt,” explain that the client’s primary logo should appear on the left chest at approximately 3.5 inches wide using white embroidery on the selected navy garment.
Names, dates, sponsor logos, personalization, contact information, award copy, and other variable information should be written exactly as the client expects to see them. Do not rely on undocumented conversations or assumptions to carry production-critical information.
How to Submit an Artwork Request
Before submission, confirm the product, decoration method, location, dimensions, colours, uploaded artwork, and written instructions. Verify that the request belongs to the correct Sales Order and product and that the attached logo files do not conflict with one another.
Outdated or contradictory artwork should be removed or clearly identified so the artwork team does not have to guess which version is current. If Elite Core provides a field or instruction area for required timing, enter the appropriate timing there when it is known.
After submission, the request enters the artwork team workflow. Do not create a duplicate request simply because the original request has not yet been completed. Use the existing request and its workflow history unless a genuinely separate artwork requirement exists.
Understanding Artwork Statuses
Artwork statuses communicate where a request is in the design and approval process. Exact status names can change with the application, so use the labels shown in the current Elite Core interface rather than relying on a generic list.
Conceptually, a request may move through stages such as a new request, work in progress, internal review, client review, revision, approval, and completion. The salesperson should use the current status to understand whether they need to provide missing information, review artwork, contact the client, request revisions, or wait for the artwork team.
Most importantly, production must be able to distinguish between artwork that has merely been created and artwork that has actually been approved by the client.
How to Review Completed Artwork
The salesperson should review completed artwork before presenting it to the client. Start by confirming that the proof belongs to the correct project, Sales Order, product, and decoration.
Compare the proof with the original request. Verify the logo version, spelling, placement, size, dimensions, colours, product colour, personalization, and special instructions. Product mockups should also show the intended product and colour whenever the mockup is being used to communicate the final visual result.
Names, dates, phone numbers, websites, event details, award copy, and personalization deserve extra attention because small errors can become expensive production mistakes. Internal production notes or technical information should not accidentally be presented as client-facing content.
How to Send Artwork to a Client for Approval
After internal review, send the current proof to the client using the appropriate Elite Core approval workflow. Make sure the client understands what they are being asked to approve.
Approval may cover the logo, spelling, product colour, decoration location, imprint colours, dimensions, personalization, and other visible production details. The current version must be sent, not a previously rejected or superseded proof.
The approval record should remain associated with the version actually presented to the client so the team can later identify exactly what was authorized.
How to Record Artwork Approval
Client approval should be recorded in Elite Core rather than being left only in an email, verbal conversation, or external message. Approval establishes which artwork version the client has authorized for production.
Before recording approval, confirm that the client responded to the current version. If approval was received outside Elite Core, preserve the relevant confirmation wherever the system supports notes, attachments, or approval history.
Silence does not count as approval. Purchasing and production teams should be able to identify the approved version confidently without having to interpret informal conversations.
How to Request an Artwork Revision
Revision requests should explain exactly what must change. Do not simply replace the old proof without recording the requested change, because the history helps everyone understand which version is current and why it changed.
Translate client feedback into clear instructions and state both what must change and, when helpful, what should remain unchanged. Instead of “Client wants logo smaller,” explain that the client wants the left-chest logo reduced from approximately four inches wide to approximately three inches wide while keeping the same colour and placement.
Marked-up proofs can be attached when appropriate, but the requested changes should still be summarized in written instructions. After the revision is prepared, repeat the internal review before sending the new proof to the client. Approval of an older version must not automatically apply to the revised version.
What Happens After Artwork Is Approved?
Artwork approval allows the job to move toward purchasing and production, provided the other required Sales Order conditions have also been satisfied. The approved artwork should remain associated with the correct product and decoration.
If Purchase Orders have not yet been created, purchasing should use the approved Sales Order configuration and artwork context when generating supplier and decorator instructions. If Purchase Orders already exist, confirm that the correct artwork or proof is visible in the applicable purchasing or proofing workflow.
The decorator or internal production department should receive the approved artwork together with the correct decoration instructions. Artwork approval alone does not necessarily mean the Sales Order is ready for production. Payment terms, deposits, Sales Order approval, shipping configuration, supplier purchasing, and other requirements may still need to be satisfied.
Production must use the exact artwork version the client approved.
Common Artwork Problems
Many artwork failures begin with incomplete or conflicting information. The wrong product may be selected, a decoration location may be described too vaguely, the logo file may be poor quality, client colours may be undefined, or written instructions may not match what the salesperson discussed with the client.
Another common problem occurs when revision comments become disconnected from specific proof versions. If the team cannot tell which comment applies to which proof, an outdated instruction can easily reappear or an older approval can be mistaken for approval of a newer version.
When artwork becomes unclear, review the Sales Order product, decoration, client instructions, source artwork, proof version, approval history, and any related purchasing or proof information before production proceeds. The goal is to restore one clear, current production instruction.
Recommended Artwork Strategy
Treat every artwork request as a production instruction rather than simply a design request. Complete information at the beginning gives the artwork team a better chance of producing the right proof on the first attempt and reduces unnecessary revisions.
Internal review should happen before the client sees the proof so obvious product, spelling, placement, colour, or instruction errors are caught inside the team. Revisions should be precise, and the approval history should remain intact so the current version can be distinguished from earlier versions.
Purchasing and production should always be able to identify the approved version without relying on informal knowledge, memory, or a separate conversation.
Practical Rule
The artwork request should tell the artwork team exactly what the client expects, and the artwork approval should tell production exactly what the client authorized.
If either of those statements is unclear, the artwork workflow is not complete.
Quick Reference
Artwork begins when the product and decoration requirements are sufficiently defined for a meaningful proof. Each request should remain tied to the correct Sales Order product and should communicate the decoration method, location, dimensions, colours, logo files, and instructions.
The salesperson should review artwork internally before client approval. Approval must apply to a specific proof version, and revisions require a new review and approval. After approval, purchasing and production must use the approved version rather than an earlier or superseded file.