

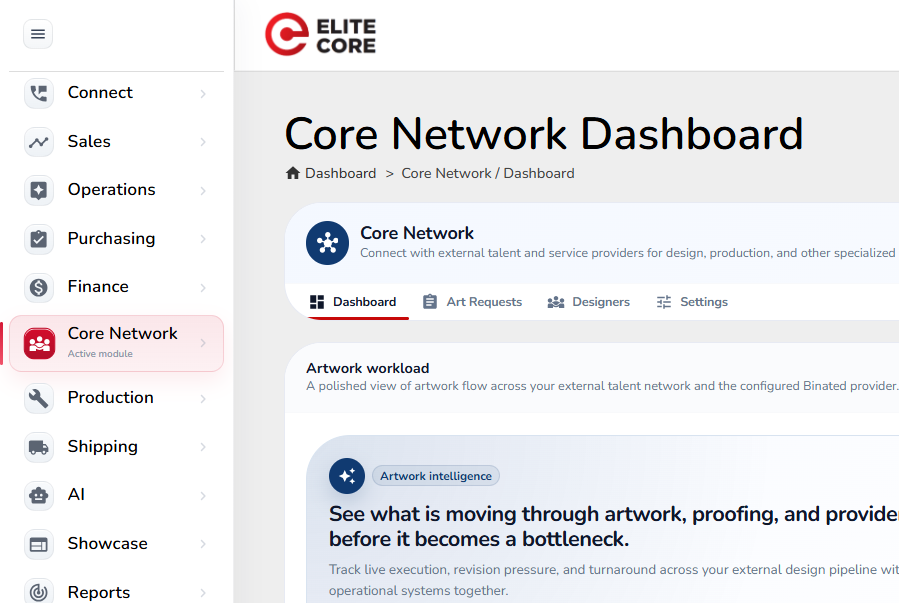
Core Network gives Order Reps and Client Reps a structured way to request design and proofing support from another designer or qualified provider without losing the Project and Sales Order context inside Elite Core. Instead of sending files and instructions through disconnected email threads, the request can stay tied to the order, carry the relevant artwork information, and move through assignment, communication, submission, revision, and approval in one workflow.
This guide explains the process from the rep’s point of view. It focuses on what you should prepare before creating a request, how to describe the proofing work clearly, how the designer receives and completes the request, how revisions are handled, and what happens when the final proof is approved.
What Core Network Is Used For
Core Network is Elite Core’s work-request system for sending specialized work to another qualified person or provider. For artwork and proofing, it can be used when an Order Rep or Client Rep needs another designer to prepare a proof, create a mockup, review supplied artwork, or complete another supported design task connected to an order.
The important difference between Core Network and simply emailing a designer is that the Core Network request can retain the order reference, Sales Order context, artwork files, instructions, deadline, assignment history, messages, submissions, revision history, and final approved result.
When an Order Rep or Client Rep Should Use Core Network
Use Core Network when design or proofing work needs to be completed by someone other than the rep currently handling the Project. This may happen when the normal designer is unavailable, the job requires a different skill set, workload needs to be distributed, or the rep wants to request a formal proof from an approved external or internal provider.
Before creating the request, make sure the Sales Order and artwork information are developed enough for another designer to understand the assignment. A designer should not have to guess which product, logo, decoration location, or client instruction applies.
Start From the Correct Project and Sales Order
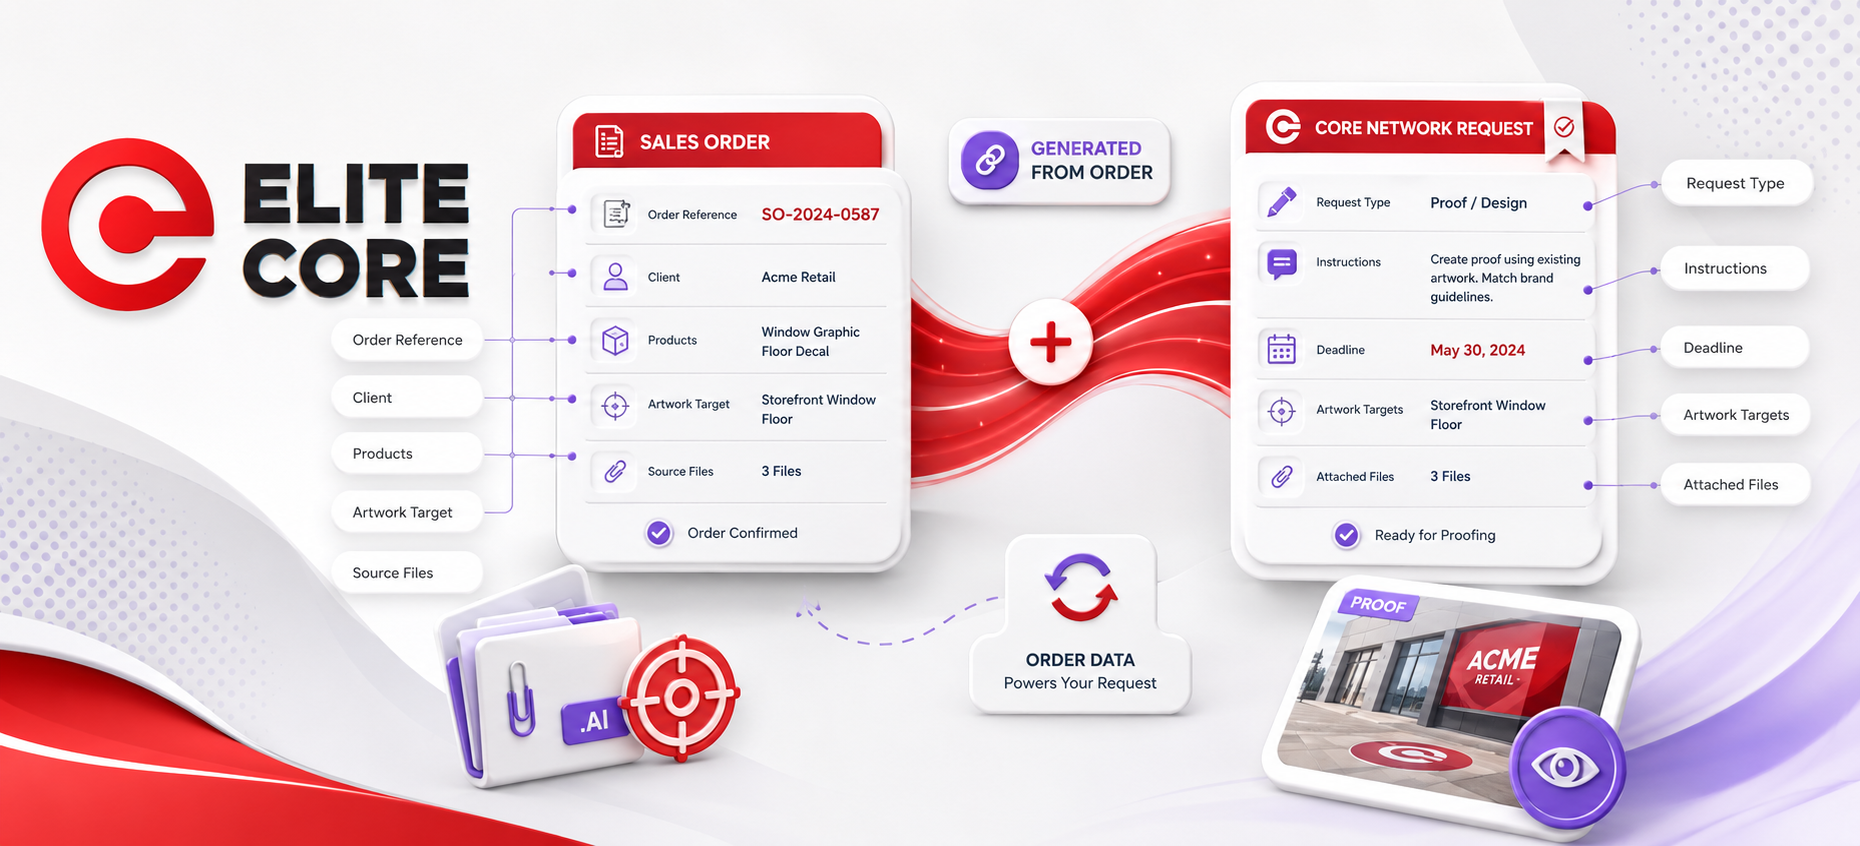
The safest workflow is to begin from the Project or Sales Order that contains the work being proofed. Core Network can retain the document context for a Sales Order, which means the work request can remain connected to the order rather than becoming a separate task with no operational reference.
Before starting the request, confirm that you are working in the correct Project and the correct Sales Order revision. Review the products, quantities, client information, decoration details, artwork instructions, and any existing artwork files that the designer will need.
Prepare the Request Before Sending It
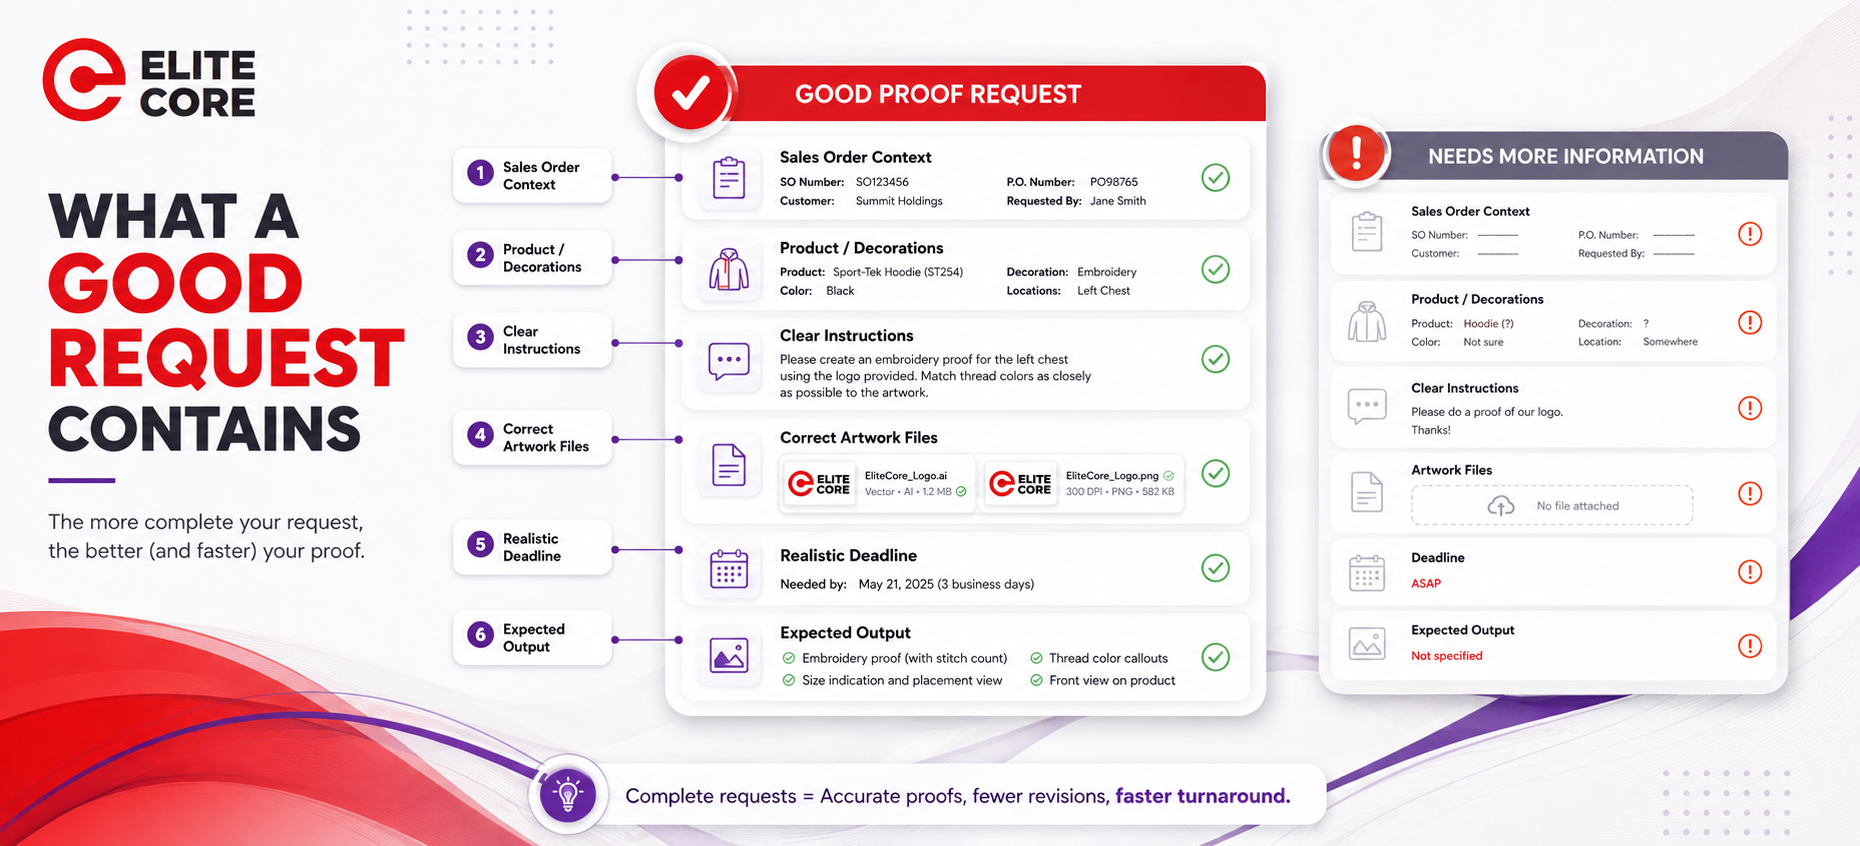
A good Core Network request should give the designer enough information to complete the proof without repeated clarification. The request should explain what needs to be created, which product or products are involved, where the decoration belongs, what artwork should be used, and what the final proof should communicate to the client.
Include any important placement information, decoration method, colours, sizing instructions, production limitations, client preferences, or reference examples that affect the design. If a client has supplied a specific logo file or previous approved artwork, attach the correct source file instead of asking the designer to recreate it from memory.
If the work is urgent, confirm that the deadline is realistic before sending the request. A deadline should represent when the proof is genuinely needed for the next Project step, not simply an arbitrary date.
Creating the Core Network Work Request
Create a new Core Network work request from the applicable workflow. For proofing-related requests, Elite Core supports proof-oriented request types and can associate the request with the Proofing source module.
Enter a clear request description that tells the designer what outcome is required. The description should be understandable even if the designer has not previously worked on the Project.
Add detailed instructions when the job requires more context than can fit naturally in the request description. If the description already fully explains the task, avoid repeating the same text in the instructions field.
Confirm the Project or Order reference, Sales Order context, deadline, and any other available request information before continuing.
Attach the Correct Artwork and Source Files
Attach the artwork files the designer needs to complete the request. Depending on the order, this may include client logos, vector artwork, reference images, previous proofs, placement examples, product images, or other supporting files.
When a request is tied to specific artwork targets, Elite Core can retain information about the related order items, decorations, and artwork records. This helps keep the proof connected to the correct part of the Sales Order.
Always check the files before sending the request. If several versions of a logo exist, make sure the designer receives the intended version. Avoid attaching obsolete files unless they are clearly labelled as references.
Finding the Right Designer or Provider
After the request has been created, Core Network can use matching functionality to identify providers who are suitable for the work. Matching can take configured capabilities and other provider information into account.
Depending on permissions and the organization’s workflow, users may generate matches, shortlist suitable providers, send offers, and select the provider who will complete the work.
Order Reps and Client Reps should focus on whether the selected provider is appropriate for the assignment. A designer who is excellent at one type of proofing work may not be the best choice for every decoration method or design requirement.
Assignment and Acceptance
Once a provider is selected, the request moves into an assignment workflow. The provider can receive the work request with its instructions, files, order context, and deadline.
The assignment history remains part of the request. This makes it easier to see who is responsible for the work and whether the request is still waiting for action, actively being worked on, or completed.
Communicating With the Designer
Use the Core Network message thread for communication about the request whenever possible. This keeps questions, answers, clarifications, and file exchanges attached to the work itself.
If the designer asks a question about placement, colours, logo usage, product details, or client direction, answer in enough detail that the designer can move forward confidently. If the answer changes the original instruction, make the change explicit so there is a clear record of the new direction.
Messages can also include attachments where supported. This is useful when a clarification requires another reference image or a corrected artwork file.
Reviewing the Designer’s Submission
When the designer finishes a version of the proof, the work appears as a submission within the request. The rep should review the submission against the original Sales Order, artwork instructions, decoration details, and client requirements.
Do not approve a proof simply because it looks visually polished. Confirm that the correct product is represented, the correct logo or artwork is used, the decoration location is correct, colours are appropriate, required text is accurate, and any production-specific instructions have been followed.
The Work Request Detail area separates submissions and review activity from messages and assignment information, which helps keep the actual proof-review decision clear.
Requesting a Revision
If the submitted proof needs changes, request a revision rather than approving the file and trying to correct it elsewhere. Explain specifically what needs to change.
For example, instead of writing “logo wrong,” explain that the designer should use the supplied white horizontal logo, reduce the width to the specified size, and move it to the approved left-chest placement.
Clear revision instructions reduce turnaround time and create a useful revision history inside the request.
Revision History
Core Network retains revision and submission information so the rep can follow how the proof developed over time. This is especially important when several versions are exchanged before approval.
When reviewing a newer submission, compare it with the latest requested changes rather than restarting the review from the beginning. Confirm that the requested corrections were completed and that the revision did not introduce new errors.
Approving the Final Proof
Approve the submission only when it is ready to become the accepted proof for the applicable work. For eligible proofing requests, Elite Core can use the approved Core Network submission as part of the artwork proof mapping workflow.
This means the approved proof can be connected back to the relevant proofing package and its associated order, artwork, decoration, or product targets instead of remaining only as a file inside the Core Network request.
The final approval should therefore be treated as an operational decision, not just a comment that the designer’s work looks good.
What Happens After Approval
Once the final submission is approved, the rep can continue with the normal artwork and client-approval process. The approved design should be reviewed in the same operational context as any other proof before the Project moves into production.
If client approval is still required, the Core Network designer’s completion does not replace that client approval. Core Network completes the design assignment. The Project must still follow the required artwork approval and production workflow.
How to Track an Existing Request
Core Network includes a Work Requests area where users can return to existing requests. Opening a request provides an overview along with separate areas for request details, assignments, messages, submissions and review, and other workflow information.
The request can also show the linked Project or Order, Sales Order, deadline, requester, provider status, and last activity. When the request is linked to a Sales Order, the detail view can provide a path back to that Sales Order context.
Use the request history rather than starting a new request simply because you need to check status. A new request should normally represent new work, not a duplicate of work already in progress.
Understanding Request Status
As the designer works, the request and provider workflow can move through statuses that describe what is happening. Depending on the type of work and provider workflow, these can include stages such as accepted, artwork review, proof required, proof sent, proof approved, revision requested, completed, or cancelled.
Use the status together with the messages and submissions. A status alone may tell you where the request is in the workflow, while the request history explains what actually happened.
What If the Designer Cannot Complete the Work?
If the provider declines, cannot meet the requirement, or the assignment needs to change, use the Core Network workflow to manage the offer or assignment rather than creating an undocumented workaround.
Depending on permissions, another provider can be matched or selected. Keep the original request instructions and relevant communication intact so the next designer has the full context.
What Should the Rep Check Before Sending a Request?
Before sending a proofing request, confirm that the Sales Order is the correct one, the products and decoration details are accurate, the client instructions are current, the required source files are attached, and the deadline is realistic.
Also confirm that the request clearly explains the expected output. If the designer could reasonably ask “which logo?”, “which product?”, “which location?”, or “what should this look like?”, the request probably needs more information before it is sent.
Common Core Network Proofing Problems
A common problem is an incomplete request. If the designer receives only a short instruction such as “make proof,” the designer has to reconstruct the Project context manually. This slows down the request and increases the chance of mistakes.
Another common problem is attaching the wrong artwork version. The rep should verify the source file before the assignment begins.
Requests can also become confusing when important decisions are made outside the Core Network message thread. When possible, keep clarifications and revision direction inside the request so the work history remains complete.
Finally, do not approve a submission until the file has been reviewed against the actual Sales Order and artwork requirements. Approval can connect the submitted proof back into the Proofing workflow, so it should represent a genuine final review.
Recommended Order Rep / Client Rep Workflow
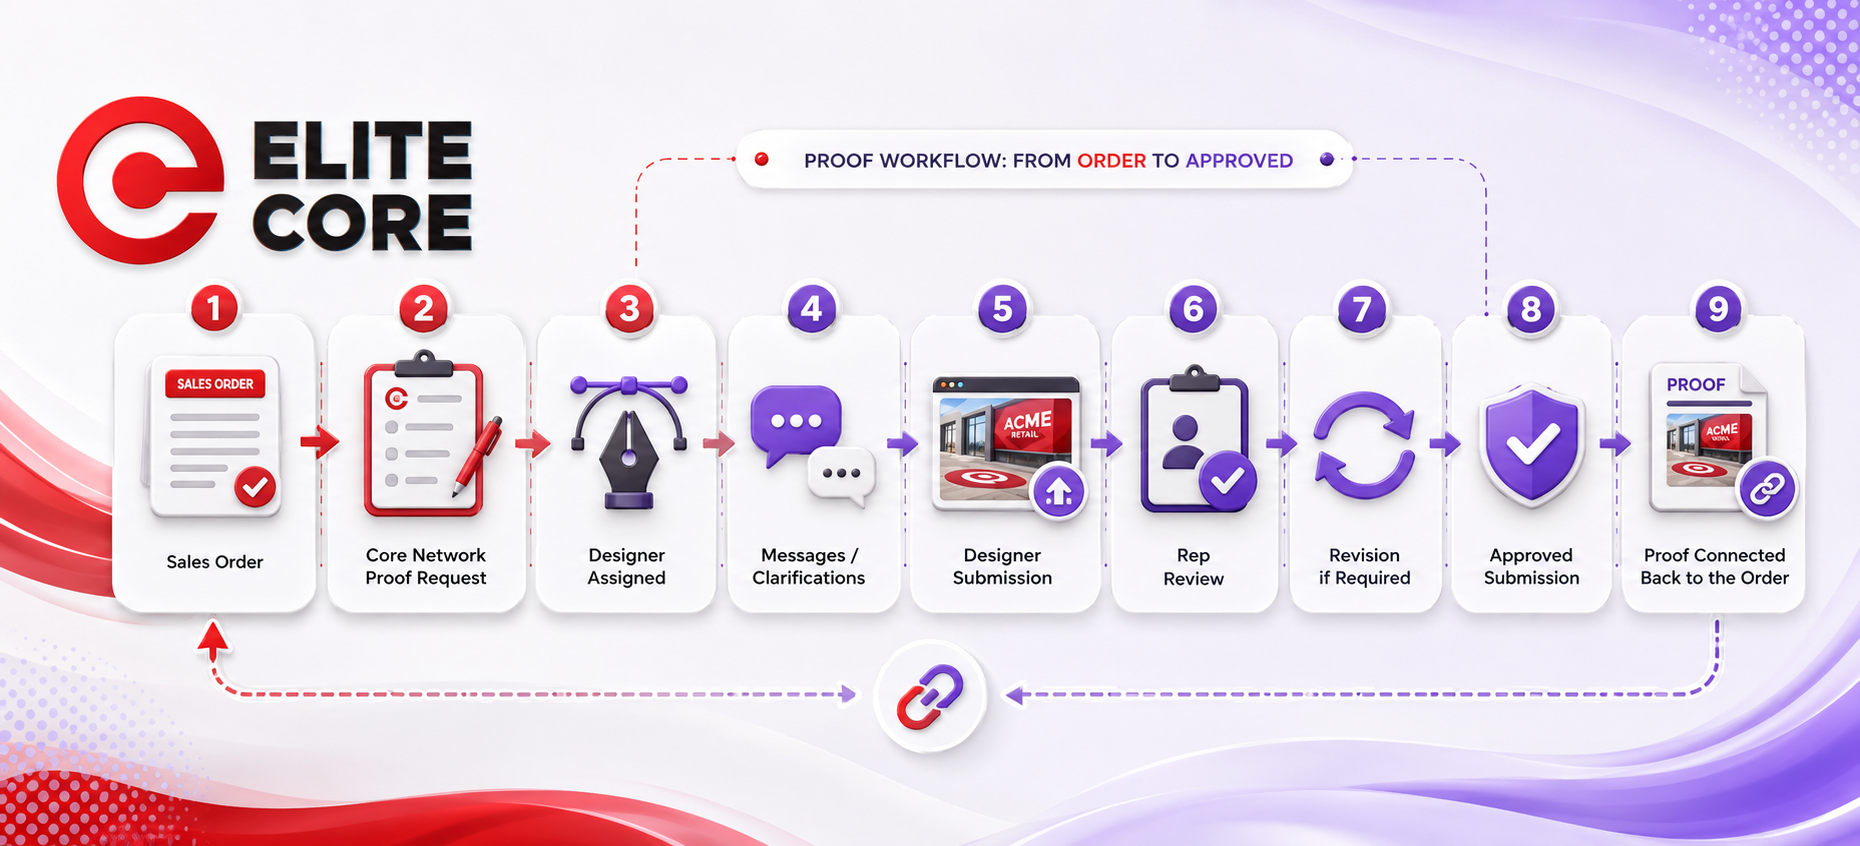
Start with the correct Sales Order and verify the artwork and decoration information. Create the Core Network proofing request and describe exactly what the designer needs to produce. Attach the correct files and confirm the deadline. Use matching and assignment to route the work to an appropriate provider. Keep questions and clarifications in the message thread. Review every submission against the order requirements, request revisions when necessary, and approve only the final correct version. After approval, continue through the normal client artwork approval and production process.
Key Takeaway
Core Network is not simply a way to send work to another designer. It is a controlled handoff between the Order Rep or Client Rep and the person completing the proof.
The strongest Core Network requests contain clear Sales Order context, accurate artwork files, specific instructions, a realistic deadline, documented communication, and a deliberate final approval. When those pieces are present, another designer can step into the Project without losing the information needed to produce an accurate proof.